
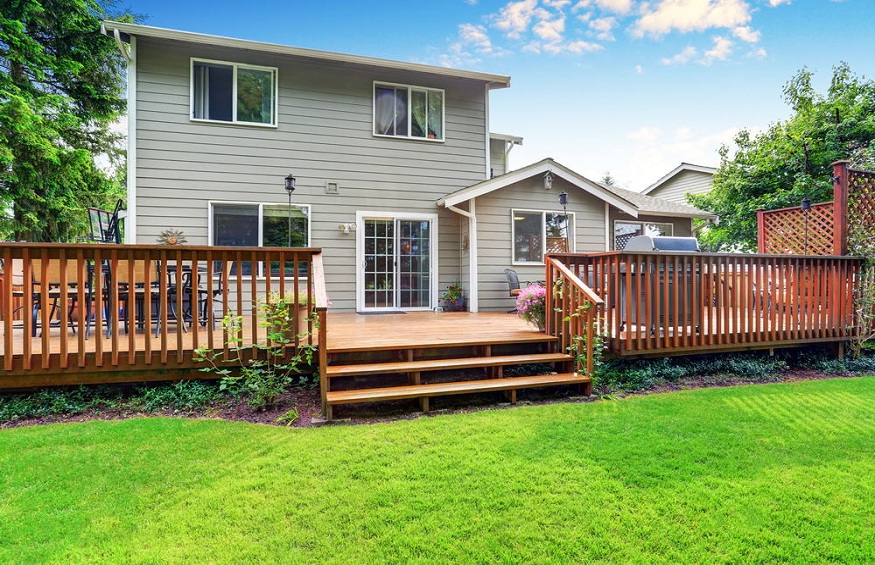
Adding a deck can greatly enhance your outdoor living space and increase your home’s value. While decks may seem complicated, with proper planning, the right materials, and by following sound construction methods you can successfully build your own.
Selecting Deck Boards
The deck boards you select set the tone for your entire project in terms of appearance, durability, and cost. Pressure-treated pine is affordable and withstands the weather well. More expensive alternatives like cedar and redwood offer a more refined look. Composite decking requires little maintenance but tends to be pricey. Think also about board width and pattern; wider planks spaced slightly apart create a modern, streamlined aesthetic.
Structural Support System
A sturdy framework is crucial for safety and making sure your deck lasts for years to come. Dig holes and pour concrete footings to stabilize wood posts or metal anchors at least 42 inches deep into the ground spaced no more than 8 feet apart. Use thick beams like 2x10s or 2x12s to tie the posts together, anchoring them with sturdy 3/8- or 1/2-inch SPAX lag screws.
Joists, typically spaced 16 inches on center, should be made of rot-resistant pressure-treated lumber with proper hangers and bracing. Consult local codes for specifics based on the size and height of your deck. Don’t cut corners when it comes to the underlying structure.
Railings and Stairs
Proper railings are non-negotiable, both for safety and aesthetics. Match material and finish for continuity. For example, buy cedar handrails and balusters if your decking is also cedar. Make sure height meets the residential requirement of 36 inches. Stairs should be stable, with traction strips to prevent slips. Have stairs follow consistent riser and tread dimensions with solid headers and footer.
Water Management
Poor drainage leads to rot, mold, and decay that can undermine your deck. Make sure the ground slopes away from the foundation so water drains off. Install drainage piping along the perimeter that feeds away from the home if needed. Protect the rim joists with metal flashing and use appropriate caulking and sealants during construction. Maintain a 1/4-inch gap between siding and decking attachment point.
Finishing Touches
You have done the structural work, now make your deck shine. Smooth any rough edges on handrails and boards. Apply protective, water-repellent sealant or stained finish per manufacturer instructions. Add lighting around posts or steps and decorative planter boxes, benches, a pergola or privacy screens if desired. Lastly, accessorize with weatherproof cushions, rugs, and patio umbrellas.
Ongoing Care and Maintenance
To maximize longevity without constant upkeep, choose durable building materials suited for weather exposure. Inspect your deck each spring. Check for winter damage, tighten any loose bolts or screws, and re-coat as needed with sealant. Keep the deck surface free of leaves, dirt and debris that retain moisture. Make occasional minor repairs promptly to prevent bigger headaches later.
Conclusion
With smart planning, you can tackle building your own deck using basic DIY skills. Just take it step-by-step, prioritizing structural integrity in the framework and using quality materials.
After all the hard work you put into carefully constructing your deck, be diligent in performing routine maintenance to protect your investment and keep it in tip-top shape. Stay on top of inspection, cleaning, sealing and spot repairs. With proper care, your custom deck has the potential to add value to your home and provide decades of happy memories with family and friends.
Get ready to relax with your favorite beverage on your hand-crafted oasis this summer. Taking the extra effort to build a quality deck is infinitely worthwhile when you can comfortably enjoy the fruits of your labor.

42 thoughts on “The Ultimate Guide to Deck Building: Techniques and Materials”
Leave a Reply
You must be logged in to post a comment.
Здравствуйте!
Задался вопросом: можно ли на самом деле купить диплом государственного образца в Москве? Был приятно удивлен — это реально и легально!
Сначала искал информацию в интернете на тему: купить диплом в грозном, купить диплом оценщика, купить диплом в новомосковске, купить диплом в киселевске , купить диплом тренера и получил базовые знания. В итоге остановился на материале: http://pavalogistics.com/2024/06/01/%d0%ba%d1%83%d0%bf%d0%b8%d1%82%d1%8c-%d0%b4%d0%b8%d0%bf%d0%bb%d0%be%d0%bc-%d0%bc%d0%b0%d0%b1%d0%b8%d1%83-%d0%b8%d0%bb%d0%b8-%d0%bb%d1%8e%d0%b1%d0%be%d0%b3%d0%be-%d0%b2%d1%83%d0%b7%d0%b0-%d1%80%d0%be/
Успехов в учебе!
1вин
Играть вулкан игровые автоматы демо бесплатно и без регистрации 777
Source:
[url=https://1wgvin.ru]1вин[/url]
[u][b] Привет![/b][/u]
Профессионалы, у которых имеется высшее образование всегда очень ценились на рынке труда. [b]Диплом[/b] о наличии высшего образования будет необходим для того, чтобы доказать свою квалификацию. Он позволяет понять начальству, что сотрудник обладает всеми необходимыми знаниями чтобы эффективно выполнить свои задачи. Но как же быть, при условии, что умения и навыки имеются, а вот соответствующего документа у человека нет? [b]Покупка диплома[/b] решит данную проблему. Приобретение диплома ВУЗа РФ в нашей компании – надежный процесс, ведь документ будет заноситься в реестр. Печать выполняется на специальных бланках, установленных государством.
[b]Где приобрести диплом специалиста?[/b]
http://doctorsforum.ru/viewtopic.php?f=193&t=38451
[b]Успехов в учебе![/b]
ремонт стиральных машин адреса [url=http://www.centr-remonta-stiralnyh-mashin.ru]ремонт стиральных машин адреса[/url] .
[u][b] Здравствуйте![/b][/u]
Для некоторых людей, приобрести [b]диплом[/b] о высшем образовании – это необходимость, возможность получить хорошую работу. Однако для кого-то – это желание не терять время на учебу в универе. Что бы ни толкнуло вас на такой шаг, наша фирма готова помочь вам. Быстро, качественно и выгодно сделаем документ любого года выпуска на настоящих бланках со всеми необходимыми подписями и печатями.
[b]Мы предлагаем[/b] выгодно и быстро приобрести диплом, который выполняется на оригинальной бумаге и заверен мокрыми печатями, штампами, подписями. Данный диплом пройдет любые проверки, даже с применением специальных приборов. Достигайте цели быстро и просто с нашим сервисом.
[b]Плюсы наших документов:[/b]
• используем лишь настоящие бланки “Гознак”;
• необходимые подписи руководства;
• настоящие печати университета;
• водяные знаки, нити и прочие степени защиты;
• идеальное заполнение и оформление – ошибки исключены;
• любые проверки документа.
[b]Документы об окончании учебных учреждений РФ:[/b]
– Способны повысить статус владельца;
– Открывают большие возможности в социуме;
– Повышают рейтинг в глазах окружающих;
– Повышают собственную самооценку.
[b]Где купить диплом специалиста?[/b]
https://cialis-in-astana21087.shivawiki.com/6632419/????????_???????_??????
[b]Успехов в учебе![/b]
[u][b] Добрый день![/b][/u]
Для определенных людей, заказать диплом о высшем образовании – это острая необходимость, шанс получить достойную работу. Впрочем для кого-то – это желание не терять множество времени на учебу в университете. Что бы ни толкнуло вас на такой шаг, наша фирма готова помочь вам. Быстро, профессионально и выгодно изготовим диплом любого года выпуска на подлинных бланках с реальными подписями и печатями.
[b]Заказать документ[/b] института вы имеете возможность в нашем сервисе. Мы предлагаем документы об окончании любых ВУЗов России. Вы сможете получить необходимый диплом по любой специальности, любого года выпуска, в том числе документы СССР. Гарантируем, что в случае проверки документов работодателями, подозрений не возникнет.
О преимуществах наших дипломов:
• используются настоящие бланки “Гознака”;
• все подписи руководства;
• мокрые печати учебного заведения;
• специальные водяные знаки, нити и иные степени защиты;
• идеальное качество оформления – ошибок не будет;
• любые проверки оригинальности документа.
[b]Наши специалисты предлагают[/b] быстро и выгодно приобрести диплом, который выполнен на оригинальном бланке и заверен печатями, штампами, подписями официальных лиц. Данный документ способен пройти лубую проверку, даже при использовании специальных приборов. Достигайте свои цели быстро и просто с нашим сервисом.
[b]Где заказать диплом по актуальной специальности?[/b]
http://b98385gb.beget.tech/2024/05/16/poluchite-diplom-kotoryy-otkroet-vam-novye-gorizonty-prosto-dostupno-udobno.html
[b]Успешной учебы![/b]
[u][b] Добрый день![/b][/u]
Мы предлагаем максимально быстро приобрести диплом, который выполнен на бланке ГОЗНАКа и заверен печатями, водяными знаками, подписями. Диплом способен пройти лубую проверку, даже с использованием специфических приборов. Достигайте цели быстро с нашим сервисом.
[b]Где заказать диплом специалиста?[/b]
http://entrainment.listbb.ru/viewtopic.php?f=96&t=23734
[b]Успешной учебы![/b]
[u][b] Привет![/b][/u]
Мы предлагаем дипломы психологов, юристов, экономистов и любых других профессий по выгодным ценам.
Мы готовы предложить документы ВУЗов, расположенных в любом регионе России. Вы сможете купить диплом за любой год, включая документы старого образца СССР. Документы печатаются на бумаге высшего качества. Это дает возможности делать государственные дипломы, которые не отличить от оригиналов. Они заверяются необходимыми печатями и штампами.
[b]Где приобрести диплом по актуальной специальности?[/b]
https://meadd.com/charlesjenkins/76812779
[b]Привет Друзья[/b]!
Всегда думал что купить диплом о высшем образовании это миф и нереально, но все оказалось не так, изначально искал информацию про: купить диплом в пятигорске, купить диплом средне техническое, купить диплом в ижевске, купить диплом в арзамасе, купить диплом с занесением в реестр, потом про дипломы вузов, подробнее здесь http://www.rrsclub.ru/member.php?u=1164
Оказалось все возможно, официально со специальными условия по упрощенным программам, так и сделал и теперь у меня есть диплом вуза Москвы нового образца, что советую и вам!
Хорошей учебы!
[b]Здравствуйте[/b]!
Хочу поделиться своим опытом по заказу аттестата ПТУ. Думал, что это невозможно, и начал искать информацию в интернете по теме: купить диплом в новоуральске, купить диплом в туле, купить диплом хореографа, купить диплом в красноярске, купить диплом в сочи. Постепенно углубляясь в тему, нашел отличный ресурс здесь: http://invest-real.blogspot.com/2014/03/ekocentrs.html и остался очень доволен!
Теперь у меня есть диплом сварщика о среднем специальном образовании, и я обеспечен на всю жизнь!
Хорошей учебы!
Добрый день!
Где заказать диплом по актуальной специальности?
Приобрести диплом о высшем образовании.
Цена значительно ниже той, которую пришлось бы заплатить за обучение в университете
http://xokke.ru/index.php?/topic/127-wyidz-fulqv-zgcpx/page/7/#comment-9142
Успешной учебы!
Привет, друзья!
Мы изготавливаем дипломы любых профессий по разумным тарифам.
Мы готовы предложить документы ВУЗов, расположенных на территории всей России. Можно приобрести диплом за любой год, указав подходящую специальность и оценки за все дисциплины. Дипломы и аттестаты выпускаются на бумаге высшего качества. Это позволяет делать настоящие дипломы, не отличимые от оригиналов. Документы заверяются всеми требуемыми печатями и подписями.
Где приобрести диплом по актуальной специальности?
http://www.irc71.ru/index.php/jomsocial/groups/viewbulletin/257-kak-podyskat-nadezhnyj-onlajn-magazin-s-obshirnym-katalogom-diplomov?groupid=47
[u][b] Добрый день![/b][/u]
Где купить диплом специалиста?
Мы изготавливаем дипломы психологов, юристов, экономистов и прочих профессий по приятным тарифам. Стоимость может зависеть от выбранной специальности, года выпуска и образовательного учреждения.
[b]Заказать диплом о высшем образовании[/b]
https://landik-diploms-srednee.ru/kupit-diplom-v-krasnodare
[b]Успехов в учебе![/b]
Здравствуйте!
Где заказать диплом специалиста?
Купить диплом университета.
Цена значительно ниже той, которую довелось бы заплатить на очном и заочном обучении в университете
http://autoschool-progress.kz/index.php?subaction=userinfo&user=ocuhizu
Удачи!
[b]Здравствуйте[/b]!
Задался вопросом: можно ли на самом деле купить диплом государственного образца в Москве? Был приятно удивлен — это реально и легально!
Сначала искал информацию в интернете на тему: купить диплом с занесением в реестр, купить диплом о среднем специальном, купить диплом математика, купить диплом в новочебоксарске , купить диплом в пензе и получил базовые знания. В итоге остановился на материале: http://free-forex-ua.blogspot.com/2011/05/blog-post_22.html?m=1
Хорошей учебы!
Здравствуйте!
Где заказать диплом по актуальной специальности?
Мы предлагаем дипломы любой профессии по выгодным тарифам. Цена зависит от выбранной специальности, года выпуска и университета. Стараемся поддерживать для заказчиков адекватную ценовую политику.
http://www.mamatyumen.ru/index.php?name=forums&op=showtopic&id=22647
Успехов в учебе!
Привет, друзья!
Где приобрести диплом по актуальной специальности?
Заказать документ о получении высшего образования вы имеете возможность в нашем сервисе. Мы оказываем услуги по производству и продаже документов об окончании любых ВУЗов Российской Федерации. Вы получите диплом по любым специальностям, включая документы старого образца. Даем 100% гарантию, что при проверке документа работодателями, подозрений не возникнет.
http://formulaf1.ru/uskorennyiy-dostup-k-karere-gde-kupit-diplom
Успехов в учебе!
Здравствуйте!
Задался вопросом: можно ли на самом деле купить диплом государственного образца в Москве? Был приятно удивлен — это реально и легально!
Сначала искал информацию в интернете на тему: купить диплом в калуге, купить диплом в новомосковске, купить диплом в миассе, купить диплом в кирове , купить диплом с реестром и получил базовые знания. В итоге остановился на материале: http://hondaikmciledug.co.id/HRIS/member.php?action=profile&uid=119757
Успешной учебы!
[u][b] Добрый день![/b][/u]
Где приобрести диплом по нужной специальности?
Мы готовы предложить документы техникумов, которые расположены в любом регионе РФ. Они заверяются необходимыми печатями и штампами.
http://92years.f-rpg.me/viewtopic.php?id=299#p323
[b]Успешной учебы![/b]
[u][b] Привет![/b][/u]
Где заказать диплом по нужной специальности?
[b]Купить документ[/b] института вы имеете возможность в нашей компании. Мы предлагаем документы об окончании любых ВУЗов РФ. Вы получите необходимый диплом по любой специальности, включая документы образца СССР. Гарантируем, что при проверке документов работодателем, каких-либо подозрений не появится.
http://club.sabaylok.com/blogs/1873/Why-is-the-popularity-of-universities-decreasing-all-the-time?lang=tr_tr
[b]Хорошей учебы![/b]
[u][b] Привет![/b][/u]
Для определенных людей, заказать [b]диплом[/b] о высшем образовании – это острая необходимость, уникальный шанс получить достойную работу. Но для кого-то – это желание не терять время на учебу в ВУЗе. Что бы ни толкнуло вас на такой шаг, наша компания готова помочь. Оперативно, качественно и выгодно изготовим документ любого года выпуска на государственных бланках с реальными подписями и печатями.
[b]Наша компания предлагает[/b] быстро купить диплом, который выполняется на оригинальном бланке и заверен печатями, водяными знаками, подписями. Диплом способен пройти любые проверки, даже с применением специфических приборов. Достигайте своих целей быстро с нашими дипломами.
[b]О преимуществах наших дипломов:[/b]
• используем настоящие бланки “Гознак”;
• необходимые подписи руководства;
• мокрые печати ВУЗа;
• водяные знаки, нити и иные степени защиты;
• идеальное заполнение и оформление – ошибки полностью исключены;
• любая проверка оригинальности документа.
[b]Где приобрести диплом по необходимой специальности?[/b]
http://seriallove.bbok.ru/viewtopic.php?id=4564#p120281
[b]Удачи![/b]
Какие мифы существуют об акне? – Одни из мифов включают веру в то, что акне вызваны плохой гигиеной, употреблением жирной пищи или недостаточным умыванием лица; эти факторы могут способствовать, но не являются прямыми причинами.
What myths exist about acne? – Common myths include the belief that acne is caused by poor hygiene, eating greasy foods, or not washing the face enough; these factors can contribute but are not direct causes.
акне лечение препараты [url=https://www.allmed-info.ru]https://www.allmed-info.ru[/url] .
Привет, друзья!
Всегда считал, что покупка диплома о высшем образовании — это миф и невозможно. Но, к счастью, оказался неправ. Сначала искал информацию по теме: купить диплом в норильске, купить диплом в мытищах, купить диплом в салавате, купить аттестат за классов, #купить диплом в кстово, а затем переключился на дипломы вузов. Подробности здесь: “http://i636356o.bget.ru/index.php?action=profile;u=318467”
Оказалось, что все реально и легально, со специальными условиями и упрощенными программами. Теперь у меня диплом московского вуза нового образца, что я настоятельно рекомендую и вам!
Хорошей учебы!
[u][b] Добрый день![/b][/u]
Мы предлагаем максимально быстро заказать диплом, который выполняется на оригинальном бланке и заверен мокрыми печатями, водяными знаками, подписями. Данный документ пройдет любые проверки, даже с использованием специальных приборов. Достигайте свои цели максимально быстро с нашей компанией.
[b]Где купить диплом по необходимой специальности?[/b]
http://inteam.maxbb.ru/viewtopic.php?f=1&t=1488&sid=9773bbac364e43b8d0b8a5a69e6b2ba3
[b]Хорошей учебы![/b]
ремонт стиральных машин дома на выезде [url=http://centr-remonta-stiralnyh-mashin.ru]http://centr-remonta-stiralnyh-mashin.ru[/url] .
Как диагностируют акне? – Акне обычно диагностируется дерматологом на основе физического осмотра и оценки типа и тяжести высыпаний.
How is acne diagnosed? – Acne is typically diagnosed by a dermatologist based on a physical examination and assessment of the type and severity of the lesions.
акне на шее [url=https://allmed-info.ru/]акне на шее[/url] .
Добрый день!
Мы предлагаем максимально быстро заказать диплом, который выполняется на бланке ГОЗНАКа и заверен мокрыми печатями, водяными знаками, подписями. Наш документ пройдет лубую проверку, даже при использовании профессионального оборудования. Решайте свои задачи быстро и просто с нашей компанией.
Где купить диплом по необходимой специальности?
https://rakisochi.ru/users/20
Успешной учебы!
Может ли стресс вызвать акне? – Да, стресс может вызвать или усугубить акне, увеличивая производство кортизола, который стимулирует выделение кожного сала.
Can stress cause acne? – Yes, stress can trigger or worsen acne by increasing the production of cortisol, which stimulates oil production.
черные угри жирные прыщи выдавливание [url=http://www.allmed-info.ru/]http://www.allmed-info.ru/[/url] .
Dogs Cane Corso in Moscow
cane-corso.moscow
ремонт стиральных машин ремонт стиральных машин .
Привет!
Наши специалисты предлагают выгодно и быстро купить диплом, который выполнен на оригинальной бумаге и заверен мокрыми печатями, штампами, подписями должностных лиц. Документ пройдет лубую проверку, даже при использовании специфических приборов. Достигайте свои цели быстро с нашим сервисом.
Где заказать диплом по необходимой специальности?
https://macadamlab.ru/wiki/index.php?title=Купить_диплом
Удачи!
отремонтировать стиральную машину в москве [url=http://centr-remonta-stiralnyh-mashin.ru/]отремонтировать стиральную машину в москве[/url] .
Как работает лазерное удаление папиллом? – Лазер направляет сфокусированный луч света на папиллому, что вызывает нагревание и испарение пораженных тканей, не повреждая окружающую здоровую кожу.
How does laser removal of papillomas work? – The laser directs a focused beam of light at the papilloma, causing the affected tissue to heat and vaporize, without damaging the surrounding healthy skin.
убрать папиллому лазером цена https://laser-removal-of-papillomas.ru .
Здравствуйте!
Мы изготавливаем дипломы любых профессий по доступным ценам.
Мы предлагаем документы техникумов, которые расположены в любом регионе России. Можно приобрести качественно напечатанный диплом за любой год, включая сюда документы старого образца. Дипломы и аттестаты делаются на бумаге самого высокого качества. Это позволяет делать настоящие дипломы, которые не отличить от оригиналов. Документы заверяются необходимыми печатями и штампами.
Где приобрести диплом по актуальной специальности?
venturetraining.net/tag/return-on-investment/
[b]Привет, друзья[/b]!
Всегда считал, что покупка диплома о высшем образовании — это миф и невозможно. Но, к счастью, оказался неправ. Сначала искал информацию по теме: купить диплом с внесением в реестр, куплю диплом высшего образования, купить диплом в тамбове, купить диплом в чебоксарах, #купить диплом с реестром, а затем переключился на дипломы вузов. Подробности здесь: http://ekspoteh.ru/index.php?name=account&op=info&uname=yjocowif
Оказалось, что все реально и легально, со специальными условиями и упрощенными программами. Теперь у меня диплом московского вуза нового образца, что я настоятельно рекомендую и вам!
Успешной учебы!
Где купить Дольче Габбана [url=http://scm-fashion.ru/]http://scm-fashion.ru/[/url] .
сколько стоит купить права на машину
Вернуть свободу на дорогах – это мечта многих автомобилистов. Именно поэтому многие люди хотят купить права на автомобиль и стать полноправными участниками дорожного движения.
Source:
сколько стоит купить права на машину
Hey people!!!!!
Good mood and good luck to everyone!!!!!
писать правильно по русски без ошибок
The future of text today with MegaText! Create unique sales materials in two clicks and unlock your potential.
Source:
писать правильно по русски без ошибок
проверка текста сео анализ текста
Режим «24/7» без устали и перерывов! MegaText создаст для вас любой контент за минуты – будь то посты для инфлюенсера, SEO-оптимизированные статьи или продающие копии. Пусть ваш бизнес живёт днём и ночью!
Source:
– https://megatext.pro
генерация картинок по тексту
MegaText – это не просто система. Это ваш верный спутник в мире качественного контента, который помогает привлекать внимание, увеличивая конверсию и удовлетворение ваших клиентов.
Source:
генерация картинок по тексту
удаленная работа копирайтером
Будущее текста уже сегодня с MegaText! Создайте уникальные продающие материалы в два клика и раскройте свой потенциал.
Source:
– https://news-bank.ru/generacziya-teksta-onlajn-kak-servis-megatext-uproshhaet-rabotu-kopirajterov-i-ne-tolko/